Pages

Sunday, September 23, 2012

Graphic 45 On the Boardwalk layout

Hi everyone!

Before we totally let go of summer...... I wanted to share this full 2 page layout with you.

It is from the last class that I taught at Scrap-a-Doodle Doo a few weeks ago. 
The ladies who attended had a fun time - and "Got Inky With It!!"

I just LOVE the "On the Boardwalk" line from Graphi 45 that was out a year or so ago.  The colors are awesome, and I love how the Sea Glass and Marmalade Bazzill cardstock goes with it!  I added some black "punchinella" ( which is the scrap from sequin production - LUV IT!) and some other mixed media items ( netting, seashells, sea glass, even real starfish!)  The deep turquoise on the sprayed dictionary pages is Dylusions Vibrant Teal - I love how it POPS!


Here are close ups of each page:

LEFT Layout:


Here is the RIGHT Layout:


Thanks for stopping by - I hope the pages inspire you !!

((HUGS)) ~ Sherri

Wednesday, September 19, 2012

Donna Downey is coming to THE DOO!


I am so excited to share the news! 
Donna Downey is coming to Scrap-a-Doodle Doo in December (14th, 15th & 16th!)

  CALL the STORE (201) 818-7060 to reserve your seat – or book it on line, following the links below. SEATING IS LIMITED and on a FIRST COME BASISYou DON’T want to miss out! SUCH CREATIVE FUN is in store!

“Donna Downey is a bestselling author, instructor and all-around creative force as a mixed-media artist. From working as a popular columnist for Simple Scrapbooks magazine, to traveling the world inspiring women to push the boundaries of their own creativity, to developing her first mixed-media scrapbooking line with Prima in the Spring of ‘09, Donna is consistently on the leading edge of taking creative risks the push the creative envelope and empowering others to do the same with their art.”


Donna teaches ALL OVER THE WORLD, and this is her ONLY NY/NJ area appearance through April of 2013!!

ALL CLASSES will be held at the beautiful Crown Plaza Hotel, Suffern, NY ... Just 5 miles from the Scrap-a-Doodle-Doo store. HERE ARE THE DETAILS: (click on the titles to reserve your seat on line through THE DOO's website!!)

Friday Dec 14th Vintage Chic Mini Album Workshop 3:30pm-7:30pm

Donna describes this class in the following manner ... "Create a 6" x 9" cardboard mini album. This album is the perfect blend of shabby & chic with each cardboard page has been delicately edged in distressed inka-inka gold and dressed in a frayed swatch of soft muslin. The album is layered in burlaps; canvas; silk flowers; frames; a timepiece and my favorite part ... a pair of soft feathery angel’s wings. The tone on tone color palette gives this book a truly romantic feel."

First Saturday Class - 12/15/12 - "The Big 40" Workshop 9am - 2pm

The first class on Saturday is a 5-hour workshop entitled "The Big 40"! Donna describes this class as a "6 x 8" art journal - Building Mixed-Media backgrounds ... WARNING: THIS WORKSHOP MAY LEAD TO INSOMNIA CAUSED BY IDEA OVERLOAD. Since I am now 40, I thought what better way to celebrate this new decade than by sharing my favorite top 40 tips, tricks and techniques for building better art journals and mixed-media backgrounds. Like all great things, building a strong foundation or base for your ideas is important and mixed-media and art journaling are no different. This workshop is going to put all these ideas at your fingertips as you create your own personal reference book for mixed media backgrounds and techniques and fill the pages of your NEW art journal. Each student will receive and work in one of my newly released art journals. The journal's heavyweight pages are perfect for layering; paints; inks; collages; PanPastels; paper, etc. I plan to do all that and more in this workshop! We will build over 40 techniques and pages worth of ideas using several different wet and dry mediums filling one incredible idea book that will surely get your mind spinning with ideas!"

Second Saturday Class 12/15/12 – “Poppy Collage Class” 3pm to 6pm

This will be the second class on Saturday and is a 3-hour workshop. Donna describes this class in the following manner: "A 6" x 18" mixed-media canvas designed to guide you through the multi-layered building of creating an original mixed-media canvas measuring 6" x 18" using mixed media tags; modeling paste; gesso; decorative tapes; fabric and paper elements. Each layer will lead you closer to creating a textural and beautiful piece of artwork celebrating strength and beauty. By keeping our color palette simple, using lots of dimensional elements and several simple techniques for applying texture you will tap into that inner artist and watch your blank canvas transform into an amazing collage."

Sunday December 16th - "Inspiration Journal Workshop" 9am - 2pm

This will be the last class for the weekend and is a 5-hour workshop. Donna describes this class in the following manner: "If you have taken your first steps into art journaling / creating a visual diary and/or are looking to take your pages to the next level, this is the workshop for you! Learn more about building layers using mediums; stencils; india inks; acrylic paints; watercolors; papers; tapes and more. Art is about pushing the boundaries and making a statement. This workshop is designed to empower you to listen to your creative instincts and will teach how to layer color, texture and channel your artistic personality into your journal pages. You will also learn tips and techniques about freehand drawing, adding details, as well as composition and balance.

Once you have registered for any of the above classes, you will be sent a list of required class supplies.

Again – Please call the store (201)818-7060 or register ON LINE as soon as possible, as SEATING IS LIMITED! I hope you can join me at this weekend of CREATIVE FUN!

((HUGS)) ~ Sherri

Sunday, September 9, 2012

Donna Downey's "Altered Brush Project"

Hi everyone!   I want to share my latest altered art creation with you.  I had so much fun making it - and I LOVE how it turned out! 

I altered this paint brush for Donna Downey's Altered Brush Project - you can read all about it - HERE on Donna's Blog

Did you every have a project that you pictured in your mind before you started to create it - and then it turned out even better than you had originally planned?  I am happy to say that is what happened with this paint brush!

It started out as a BLANK canvas - The brush is 4" wide and @ 8" tall.


I added some Gesso, okay - I added LOTS of Gesso on the metal section -and even added some to the top part of the bristles - Then  I heated it with my heat gun to dry - I wanted to get some color on this baby!!


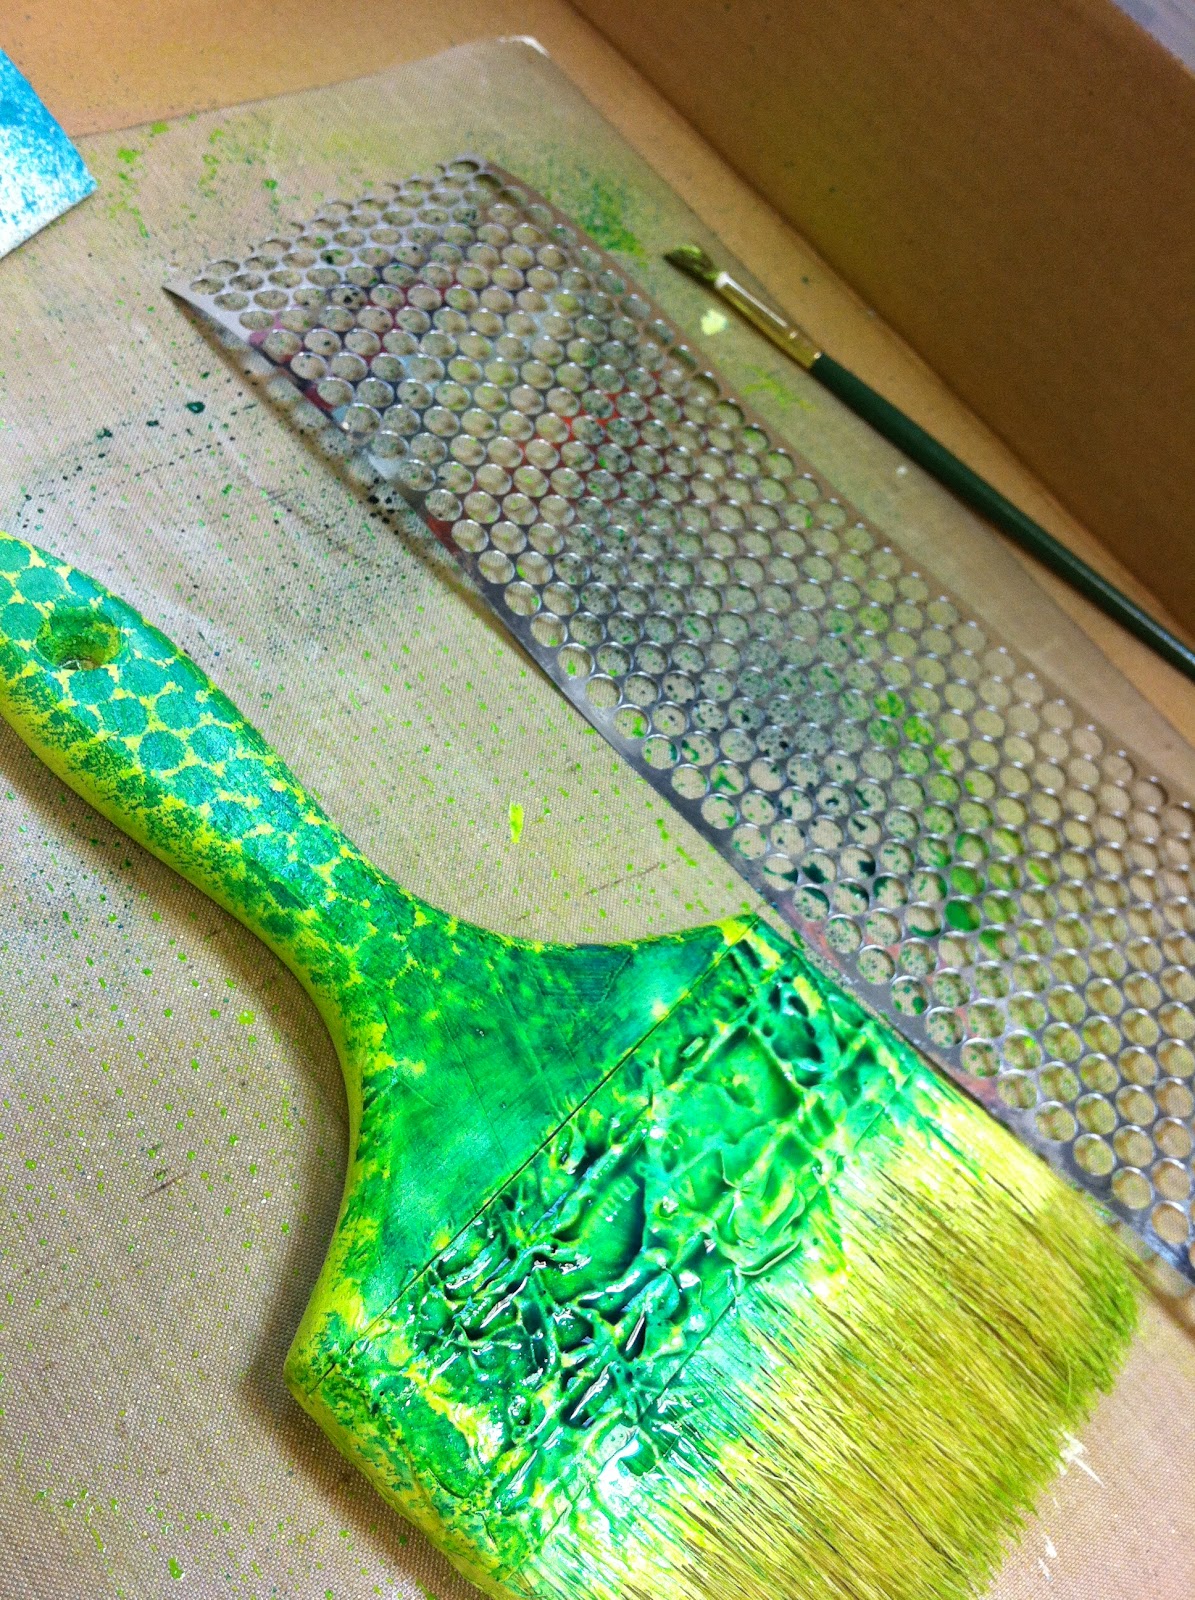
Now it was time to give it a spray with one of my favorite products - Tattered Angels Glimmer Mist - this first layer was
with the Limited Edition Color "Blarney"


Time to add another layer - I spritzed it with some Tattered Angels Chalkboard Glimmer Mist - Color "Inchworm" (love that name!)  I even ran the bottom bristles through the over spray on my splat mat!


I decided to use a piece of Punchinella as a mask ( Do you know what Punchinella is?  It is the "waste" from when sequins are made!  Cool huh?!)  I had fun using the BEAUTIFUL NEW Dylusions Spray - in Vibrant Turquoise - LOVE IT!!


BUT - I really wasn't happy with the spots / mask effect -so....

I gave it another spritz with the Dylusions, and moved it around with a paint brush -and I was satisfied! I love how it filled in all the "low spots." I then ran the bristles through the over spray on the splat mat too. I added a little "Waterfall" Glimmer Glaze to the bottom of the bristles too.


Now it was time to decorate!  ( THE 2nd funnest part!)  I knew I wanted to use the peacock feathers I had in my stash -I draw lots of inspiration from them - as you can see in this project, and on many others I've made. These came from a giant fan of peacock feathers that my boss brought back for me from a trip to India -- I have used so many of them on my projects, and have used them for classes that I have taught - I will be sad when there are none left.  

I also knew I wanted to add different elements and a little BLING to the brush -so I went into my old jewelry stash, and pulled out the beautiful butterfly pin, and that round bead/sequin dark blue earring. ( These were gifts to me from my good friend, and scrapping buddy, Pattie.  They were some of the costume jewelry pieces that belonged to her mother, and she passed them along to me, as she know how much I like to add jewelry/mixed media "stuff" to my projects.  It is a pleasure to be able to add these special elements, and know that they will continue to be viewed by others, both online - and in person in Donna's studio!)

I needed some orange to pick up the details from in the butterfly, and another good friend ( my sista-from-another-mother) Stephanie ( who happens to own the cutest little scrapbook and on-line store Scrap-a-Doodle Doo!) came to the rescue with the beautiful orange spray of crystals, and the orange bling gems.  The other flowers were from my stash!
(P.S. Donna Downey is going to be teaching at THE DOO, December 14,15&16 -click on the link above for class info!)

Here are a few close ups:


I knew I wanted to use the words "DREAM BIG" and I thought the Tim Holtz Alpha Parts/Random black letters would be perfect!   I love this phrase, and draw from its strength when I am faced with disappointment, or doubt, or feel sad.  The inspiration comes from the song - "Dream Big" by Ryan Shupe and the RubberBand which is one of my favorites.  I use to have it playing on my blog -but that service no longer works ( if anyone knows how to get music on their blog -please clue me in!)  You can click on the name of the song to hear it - but be forewarned - the only video I could find has an add that you have to sit through in the beginning.

Here is the finished piece:


I will be sending it off to Donna tomorrow.  Keep watching her Blog to see all of the beautiful brushes that others have sent in - and if you are on Pintrest - you can follow along there too! I can't wait to see my brush on there soon! 

I'd love to hear from you - feel free to leave a comment!

Thanks for stopping by!
((HUGS)) ~ Sherri


Sunday, September 2, 2012

Salted Caramel Cheesecake Shooters

Okay - I've teased some of you enough with the close up shot on my Facebook page
DISCLAIMER: These are little plastic cups that I had laying around, that happened to say Starbucks -these have nothing to do with Starbucks or coffee. They were just the right size - and a spoon fit in them nicely.

- So ... here is the post that I promised!

I have this new "addiction"  SALTED CARAMEL!  Well, it is not really all that "new" as it all started back in September 2011, when Hubby and I went to Walt Disney World, and I had my first taste of it at the Karamell-Kuche!  ( Not sure how you pronounce the 2nd word  - but Karamell I know!)
This AMAZING PLACE is located in EPCOT, in the Germany Pavilion  - Don't miss it!!


REALLY! How are you supposed to choose!!!?????

Well, Hubby and I opted for a Bullseye (His) and me (say it with me without drooling) a Dark Chocolate Salted Caramel!! YES!!
Excerpt from Shades of Salty CaramelIt was a hot and hazy day in EPCOT. After making our purchases,  we sat on a bench overlooking the lagoon. I remember taking my first bite and the carmel stretched from my lips to the candy, and then stuck to my chin. I was not ashamed to stick my tongue out and lick my lips and try to reach the sweet sticky caramel I found there.... I savored the little morsel's sweet yet salty goodness by taking my time (about 4 bites) and licking the dark salty chocolate off my fingers in public, in broad daylight!

Okay - now back to your regularly scheduled blog post....

So -I saw this pin on PINTREST and it brought me to a Blog called In Katrina's Kitchen. If you click on the name - you will go there too (check it out - A-mazing stuff!) - but please wait until you are done reading below, as I TWEAKED the "recipe" a little bit  ( THANKS Katrina for the inspiration!) 

Here are the Ingredients I used:

*No-bake cheesecake filling

(I used Philadelphia Brand in the dairy section by the cream cheese)

*Caramel sauce (Smucker's Sundae Syrup)

*Sea Salt ( OOPS!! not in photo - I used Cerulean Seas Course Crystals)

*Crushed Ginger Snap Cookies

*Rolos candy (optional)

Instructions:

1. Crush the cookies in a baggie, (1 per shooter)

2. Spoon cheesecake into a piping bag or large Zip Lock bag, and cut off the tip

3. Spoon just enough cookie crumbs into each cup - just to cover the bottom

4. Drizzle the Caramel Sauce along the sides of the cup, turning as you go, and then on top of the cookie crumbs

5. Sprinkle with a pinch of Sea Salt

6. Add a layer cheesecake, and repeat until you reach the top of your glass/cup -ending with Cheesecake.

7.Garnish with a little more caramel, salt and a Rolos candy (mini) cut in half, if desired.

8.Keep chilled until ready to serve.

I would say you could get at least 20 out of a the container of Cheesecake filling as shown - depending upon the size of your cups.

These are VERY RICH - so and the small size is perfect!  ENJOY!!

Leave me a comment if you try them!


((HUGS)) ~ Sherri