Greetings everyone!
I hope you all had a WONDERFUL THANKSGIVING and were able to spend time with your families!
Welcome to my BLOG - I want you to know that I am THANKFUL for ALL OF YOU too!
SO - Since I LOVE using CHIPBOARD in my projects and I LOVE Blog Candy too - I thought I would combine the two of them in this post !!
In case you've ever wondered - "What the heck can I do with Chipboard?" This POST is for YOU!
And, since you have been so nice to stop by - I'd thought I'd offer you a little TREAT! Please continue reading and see the SWEET details and photo of the give-a-way at the bottom of this post!
~~~~~~~~~~~~~~ I AM SO EXCITED!!~~~~~~~~~~~~~~~~~
I read about a Design Team call for a company in Australia. It is called Imaginarium Designs and is a new Chipboard Company formed in 2010. It is the collaborate effort of a Mother and Son who both love designing and working in the Papercraft Industry. ( I REALLY Love the Mother and Son part - as I am a Mom of 2 sons!)
One of the criteria for applying for their DT is to create a BLOG ENTRY which posts 10 of my favorite projects featuring chipboard - so here is my post!! ( Hello Imaginarium Designs!!! )
AS you will see - I LOVE using chipboard!! It adds dimension ( and I am all about that!! ) and is very versatile. It can be painted, dry embossed, heat embossed with powder, Glimmer Misted, sanded layered - an more - wherever your imagination leads you - It is so much FUN!!
So with 10 projects to show you - grab a cup of coffee or tea and sit back an relax, and join me on this Chipboard Journey!
Without further ado ...... and in no special order -here you go:
#1 "Beautiful La Jolla"
 |
This is one of my most recent layouts documenting our first ever trip to California. I wanted to highlight the Blues and Browns of the ocean and the wall, but had to find a way to make my Hubby's RED shirt work with the beautiful papers I selected. I also wanted to show you how much fun and how versatile Chipboard can be!
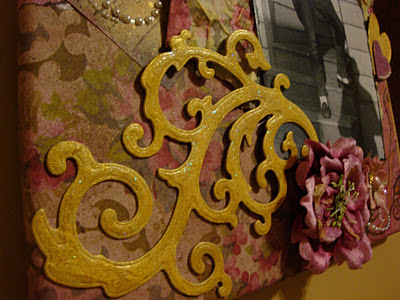
I ran the big flourish (above) through my CuttleBug first to give it texture. I gave it a light/thin coat of gesso then sprayed it with Patina Glimmer Mist, and added some Mermaid Glimmer Glam, along with some Waterfall Glimmer Glaze -"here and there." To tone it all down and make it a little more rustic, I used Ranger Distress Embossing powder in Fired Brick to add some more RED to the layout.
Here is a close up so you can see the cool result!
I just LOVE these Wrought Iron Trim Chipboards too! I used the same technique on these 3 pcs as I did on the flourish - but I did not run it through the CuttleBug first. I also backed all of the chippies on a light blue paper, then cut around the edges with an Exacto Knife, so that they popped and stood out a little on the busy patterned paper. ( that part was a little time consuming -but I think well worth it - don't you?!)
Next up #2 "ALL ABOUT ME!"
|
 |
I made this page for a challenge to scrap a page only about yourself. I must say, this was probably the first time I've ever done that - it was a little scary -but in the end so much fun! The Chipboard used in this layout was from various collection in my scrap stash. There is actually a Chipboard Tag under the Chipboard "49" that I covered with patterned paper to make the numbers on top of it "pop" a little. The letters and #s were sprayed with Glimmer Mist. Have you every scrapped a page just about YOU?
If you haven't GO AHEAD - I give you permission - it really is quite fun actually! |
On to #3 is a "Chipboard Album"
This is a gift I made for a very close and dear friend who turned 50. The album itself came with only 3 pages - but I wanted MORE! So I cut chipboard to size and added 3 more pages - and bigger hoop rings to hold it all together. All the pages were covered with different colored/patterned papers. The letters on the cover are Glimmer Misted Chipboard letters as well! ( Oh, by the way - he LOVED his gift!! I think that Personalized Handmade gifts really show you care ;o) )
#3 "YOU and ME"
 |
This photo was from our family trip to Walt Disney World to celebrate my parent's 50th Anniversary.

The Chipboard hinge in the bottom right corner was first inked with Fired Brick Distress Stain, then a coat of Tattered Angels' BE Positive Glimmer Glam, and finally some Vintage Photo Distress Stickles. The pearls for brads were made with a Viva Decor' Bronze Pearl Pen
I have to show you a close up of what I did with the swirl on the upper left corner -
I inked the leaves with Peeled Paint Distress Ink, the Birds with Faded Jeans Distress Ink, and the vine/swirl with Fired Brick Distress ink. I added Waterfall and Orange Crush Glimmer Glaze by Tattered Angels, along with Espresso, Be Positive, and Mermaid Glimmer Glaze, then some Shabby Shutters, Vintage Photo, Dried Marigold and Frayed Burlap Distress Stickles!! I am so pleased with how it came out! |
#4 "May your SMILE..."
 |
This is a layout I made to remember our son's honor awards ceremony, prior to his college graduation. He received the Marlin Fitzwater Scholar Medallion, and graduated Magna Cum Laude!
Needless to say - we are VERY PROUD!
Oh - what didn't I do to these Chipboard pieces!! The large flourish on the top left and small sprig of leaves on the bottom left. I ran them through my CuttleBug with the Textile Folder and then they were sprayed with an Aqua Glimmer Mist, then touched here and there with Versamark, and heat embossed with Ranger Distress Embossing powder. I then hit them with a little "Mermaid" Glimmer Glam. I did the same to the Chipboard letters that spell "SMILE" but without the heat embossing or powder. There are 2 more pieces of chipboard on this layout - they are a golden rust color, as they were also sprayed with Glimmer Mist - then coated with Dimensional Glass to make them so shiny.
|
#5 - Listen with your Heart - Canvas
 |
| This is a canvas that I made for my 92 yr old Grandmother for Christmas. I used a magazine clipping that she had cut out and saved, as it reminded her of her brother. It talks about the Wise Old Owl and the importance of really listening. I used lots of Glimmer Mist to color the canvas. |
 |
| The Tattered Angles Chipboard Swirl was sprayed with Glimmer Mist, and then painted with Glimmer Glam to give it lots of sparkle. It makes a nice perch for the Glimmer Glass Owl - don't ya think!? The charm from Tim Holtz reads "Listen" |
 |
| A Chipboard Heart, sprayed with more Glimmer Mist made a great addition along with the Glimmer Glass wings I think. You can also see a close up of the Chipboard Letters that were sprayed with more Glimmery Goodness! Chipboard LOVES Glimmer Mist! ( If you haven't already figured that one out! LOL!) |
#6 A Women of Valor -
This was a Canvas Gift I made for my Boss -to honor and celebrate his Mother, whom he had lost earlier in the year. When he showed me this wonderful photo of when she was a young girl - I just knew I had to do something to honor the photo, and his lovely Mom. ALSO - notice the shadow on the bottom right of the photo - that is his Grandfather taking the photo of his Mom - what a treasure!!
 |
| LOTS of Chipboard going on here! There are lots of Tattered Angel Chipboard Elements, as well as other flourishes, and hearts. All have been sprayed or painted with Glimmer Mist ( I love dipping my brush in it too!) and/or layered with Glimmer Glaze or Glam. |
 |
Here is a close up of the swirl with the shimmer of the Glimmer Glam! All of the chipboard used on this piece really adds to the many interesting textures and layers.
#7 BROTHERS -
|
I made this little Mini Chipboard Album to capture photos from a fun Bar-B-Que spent with my husband and his 2 brothers. I love it when we all get together - there are always a lot of laughs and smiles. This also became a kit and class that I taught at my local and favorite Scrapbook Store - Scrap-a-Doodle Doo
 |
| Besides the book itself being chipboard ( and covered with paper) The tag on the left is chipboard as well as the swirl on the cover. The tag was inked with Ranger Distress Stain, and Stamped. The Chipboard flourish was also inked - and then heat embossed with Ranger Distress Embossing, and finally coated with Ranger Distress Crackle paint too! |
 |
| I was trying to get that aged metal look - I think is succeeded don't you?! |
#8 - Sons
 |
| This layout was made for a Purple/Green/Cream challenge ( that I won!!) I LOVE the smiles on our faces, and am so happy I was able to capture them and cherish them in this layout. I used pre-finished green chipboard hearts and swirl - and then covered the letters with paper and inked them for the word SONS. Speaking of that word - I'll let you in on a little secret - the "S's" were from 2 different alpha styles and I couldn't find an "N" so I cut of one leg of an "M" to make it work - Have I mentioned how versatile Chipboard is? ;o) |
#9 - NEW YORK, NEW YORK! ~ Canvas
 |
This is another canvas piece. I was commissioned to make this for an associate. She wanted NYC as the theme, and black and red for the colors. The NYC Chipboard Letters have that stencil look and I love how they just POP on the canvas.
They were painted with SILVER Ranger Distress Crackle paint - I think they really took on a metallic look and feel - perfect for NYC!
#10 - THE DAVID
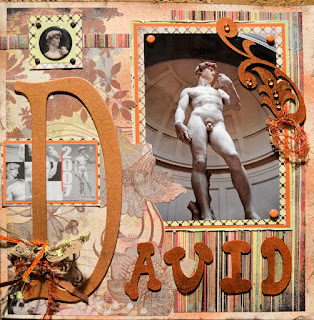
This is one of the FIRST times I ever used Chipboard and as you may be able to tell - I've been hooked ever since!! This layout is from our 2007 trip to Italy. I am a BIG Fan of Michelangelo and was in AWE of his MASTERPIECE "The David" as our guide referred to him. He made the stone come alive - the details were breathtaking. The chipboard in this piece was sprayed with Glimmer Mist and I even tied some fibers to the "D" and the flourish.
|
Look at the close-up of this flourish - the Terracotta Glimmer Mist just loves to shimmer on it! The clear Dew Drops pick up the color underneath and look almost wet - giving more dimension to the chipboard.
~~~~~~~~~~~~~~~~~~~~~~~~~~~~~~~~~~~~~~~~~~~~~~~~~~~~~~~~~~~~~~~~~~~~~~~~~~~~~~~~
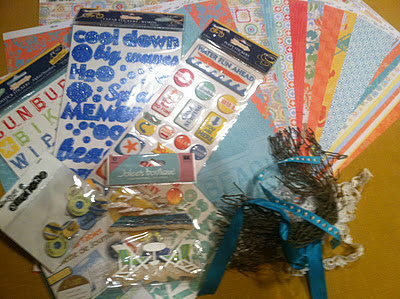
And now for my FIRST BLOG CANDY give-a-way!!! I've put together a mini kit to give you WARM thoughts for the COLD weather ahead. You can pull out some of your left over summer photos and make some GREAT pages with all these "HOT" goodies! Here are the DETAILS on how to enter to win this SWEET prize pack!:
 |
| There are 12 pcs (2 of each design) of Little Yellow Bicycle's BOARDWALK Collection, along with 4 packs of coordination embellishments, some buttons, Jolee's stickers, buttons, ribbons, lace and netting. I am sure you will make some AWESOME layouts or projects with these SWEET goodies! |
There are 4 ways to be eligible to WIN!
Here is what you need to do:
1. Be a Follower of this BLOG http://www.shercara.blogspot.com/
2. LIKE my NEW "For The LOVE of PAPER" Facebook Page and leave a comment there.
3. SHARE this post on your Facebook Page or Blog.
4. Leave a comment to this post letting me know which of the above you've done and which Chipboard project above, you liked the most.
I will draw a WINNER on DECEMBER 4th- GOOD LUCK everyone!
Thanks,
Sherri


